 |
Yumoto Orthopaedic Clinic (JP HOME) is the Originator of Percutaneous Trigger Finger Release Surgery with Guided Knife |
Since 2011/07/31 |
|
||||
|
Yumoto Orthopaedic Clinic (JP HOME) is the Originator of Percutaneous Trigger Finger Release Surgery with Guided Knife |
Since 2011/07/31 |
|
||||
| Guided Knife Technique - Deviding A1 Pulley subcutaneously - |
| ・ Author of this Home Page has named Trigger Finger Operation with Guided
Knife as GK-PTFR Surgery. ・ His anual trigger finger surgeries reach 700, with ecellent results. ・ Foreign Doctors who want to visit his operative theater are welcome. Please apply beforehand, and bring Japanese Interpretor on the very day, thank you. GK-PTFR Surgery is four stage technique as follows. Guide Insertion[Insertion of guide section]Illustration below is from my contribution to "Journal of Minimally Invasive Orthopaedic Surgery No.34, All Japan Hospital Publishing Co., 2005". The symbols D and P are for distal and proximal respectively. 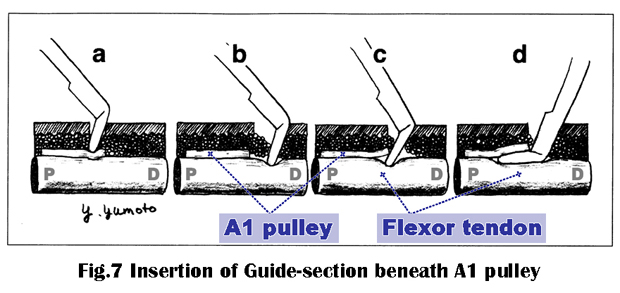 a: Tip of guide section lightly pushes against surface of A1 pulley making temporary indentation. b: Keeping guide section upright and pushing downward, sweep it distally along the path of flexor tendon. Guide section will be disengaged with A1 pulley and comes in contact with flexor tendon. c: By reversing the sweep direction and gradually reclining guide section into horizontal position, it slips beneath A1 pulley. d: Guide section is set correctly. As tip of guide section is round and smooth, A1 pulley and flexor tendon are free from scratches during the procedure. [Sharp knife operation] When distal margin of A1 pulley is palpable beforehand, I use Sharp knife from the start. Many of the cases in VideoLibrary have been operated this way. I recommend use of Blunt knife for surgeons who are going to employ Guided Knife for the first time. [Advantage of Blunt knife] Advantage of using Blunt knife is safety of operation. Unintentional soft tissue injury could be prevented by repeated trials of guide insertion with Blunt knife, but not with Sharp knife. Once guide section has been inserted in the right place, there is no difficulty in changing with Sharp one. This is the reason why Sharp and Blunt knives are in the same shape. [A1 pulley survey and finger position] 1) Distal margin of A1 pulley of thumb is nearer to the epidermal surface than proximal margin, and very easier to palpate. It is true for other fingers too. This is one of the reasons that distal edge of the pulley is the start of division in Guided Knife technique. 2) Fingers must be fully extended during survey of A1 pulley by palpation until guide insertion, in order to keep A1 pulley nearer to epidermal surface. To make objective estimation that the guide section has been set correctly, go to the next article, Lift Up Resistance Test (LURT). |
|
|
|
|
LURT[Lift Up Resistance Test (LURT)]Guide insertion must be followed seamlessly by Lift Up Resistance Test (LURT) in order to justify that it really has caught A1 pulley margin. Lift Up Resistance Test (LURT) is a term that I assigned to explain GK-PTFR procedure. 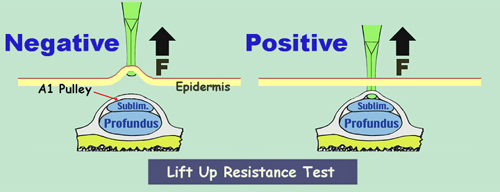 On the right is a positive LURT, where Guided Knife would never be lifted up as A1
pulley is a rigid structure. Positive LURT is required to go on division. On the right is a positive LURT, where Guided Knife would never be lifted up as A1
pulley is a rigid structure. Positive LURT is required to go on division.On the left is a negative LURT, where Guided Knife bounces up farther proportionate to the force applied on itself, because dermal tissue could not hold the guide section rigid enough. Negative LURT is an evidence that guide section has missed A1 pulley margin, and guide insertion must be done once again. |
|
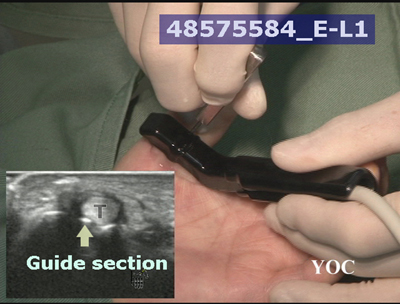
| [Ultrasound observation] Ultrasound is very useful for observation of guide section at Blunt knife LURT. The picture at right is a scene from the following video, where you will find everything of LURT. The ultrasound inset shows guide section being placed in a wrong position. If A1 pulley division had been carried out thereupon, a strong resistance would be met resulting in discontinuation. If forceful division had been carried out, either serious tissue damages should occur or Guided Knife be broken. |
Ultrasound Inspection of Guide portion (Still Image) |
 |
|
| Ultrasound observation is not recommended at Sharp knife LURT for fear
of harming ultrasound probe. . [Blunt knife ready] Although GK-PTFR with Sharp knife alone is the most preferred for myself, I never forgot to make Blunt knife ready in the operation tray. Whenever I fail in the first LURT with Sharp knife, I do not hesitate to put it aside and try guide insertion with Blunt knife all over again. |
Video presentation of the operation |
|
Loading the player...
|
|
|
|
|
Guided Division[Guided Division]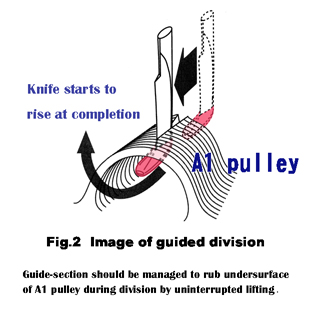 Guided Division again is a term I assigned to explain GK-PTFR procedure, and essential technique for GK-PTFR. Fig.2. is a modified reproduction from my contribution to the book below. When A1 pulley has been divided halfway like this, the consequence is very easy to predict because of the role of guide section. In GK-PTFR, passage of the division of A1 pulley could easily be foreseen if it had started from the right place, due to the role of guide section, hence the term guided division. Generally speaking, as percutaneous trigger finger releases are closed operations, it is very encouraging that final achievement comes as a natural consequence and not dependent on good luck in GK-PTFR. "Trigger Finger Operation by Guided Knife", p.2-9. Yoshiji Yumoto [Blade Section] 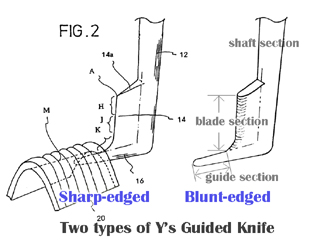 (Comments from the inventor) Right figure demonstrates two types of Guided Knives, and part names are the same. During the guided division as in the upper illustration, K is the functional part of Blade section. You may have witnessed in my operation videos already that H sometimes projects from the epidermal surface during and around guided division. |
|
|
|
|
Tip-up division techniqueTip-up division technique (1)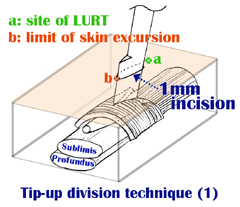
This is an imaginary drawing of A1 pulley division at the halfway. "a": corresponds to the starting point of A1 pulley division or LURT on epidermal surface. There is no incision anymore here as it has moved to b. "b": corresponds to the farthest point of A1 pulley division as it has been carried out halfway. When the limit of skin excursion has been reached here, you would feel division resistance multiplied all of a sudden. Forceful attempt to move ahead would end in division of both A1 pulley and epidermis together. (-> see " Skin slide" for "limit of skin excursion") |
|
Tip-up division technique (2) 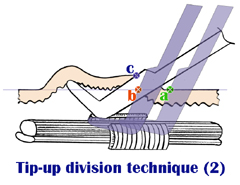
Here is the division technique. Tip-up division technique provides a secure way to divide the remaining A1 pulley without epidermal injury. Points "a" and "b" are equivalent in both drawings. Shaded outlines of the knife from "a" to "b" are in the same angle from horizon. At point "b", gradual inclination of the knife turns tip of guide section upward. Then by moving the Guide-Blade complex upward, the remaining A1 pulley would be completely divided. The epidermis is free from injury as there is room to escape upward. |
|
Tip-up division technique (3) 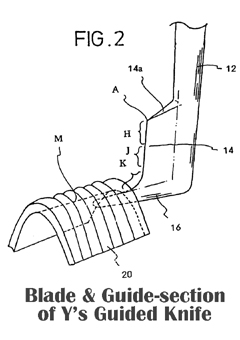
This drawing is from my patent application documents. Blade section consists of three parts, H,J and K. These are imaginary divisions and there are no actual marks between them. "H": Part of blade section that rises above the epidermal surface as in the drawings above. H varies in individual cases. "K": Functional part in A1 pulley division from point "a" until "b" in the same drawings. "J and H": Functional part at Tip-up division of A1 pulley. |
|
|
|